티스토리 뷰
1. Controller와 View 생성 예시

Controller와 View 생성 예시로, Request Mapping을 통해 경로를 설정할 것이고, 그 Request를 처리할 HomeController를 만들것이다. 그리고 View Template인 main-menu.jsp를 통해서 페이지를 보여줄 것이다.
(1) 개발 과정
1) Controller Class 생성
2) Controller method 정의
3) Controller method에 Request Mapping 추가하기
4) View name return시키기
5) View page 만들기
(2) 코드 예시
package com.luv2code.springdemo.mvc;

import org.springframework.stereotype.Controller;
import org.springframework.web.bind.annotation.RequestMapping;

//1. Create Controller class
@Controller
public class HomeController {

	//2. Define Controller method
	@RequestMapping("/")
	public String showPage() {
		return "main-menu";
	}
}
1) Controller class에 @Controller annotation을 기입한다. 이는 Spring MVC controller라고 알려주는 역할을 한다.
@Controller는 @Component를 상속받고 있기 때문에, Component Scanning할때 @Controller에 해당하는 class도 똑같이 bean에 등록한다.
2) Method 정의시, 이름은 마음대로 줘도 된다. 그리고 parameter를 넘기는 개수또한 마음대로 여러개를 넘겨도 된다 (예를들어 reqeust parameter, session objects, model objects...)
3) @RequestMapping("path name")을 통해서 해당 method에 특정한 web request에 대한 path를 설정해 줄 수 있다. @ReqeustMapping을 통해서 실제 경로를 mapping하기 때문에, method이름을 아무렇게 설정해도 되는것이다.
4) View 이름을 return시켜 줌에 따라, background에서 설정 파일을 사용해 view page를 찾아준다. (이전 post에 configuration할때, view resolver를 설정해준 것에 따라서, prefix와 suffix를 붙혀 경로를 설정해준다.)
<!DOCTYPE html>

<html>
<body>
<h2>Spring MVC Demo - Home Page</h2>
</body>
</html>
5) View page를 만드는것은 JSP나 HTML이나 상관없다.
2. Spring MVC를 통해 Form data를 읽는방법 (예시)
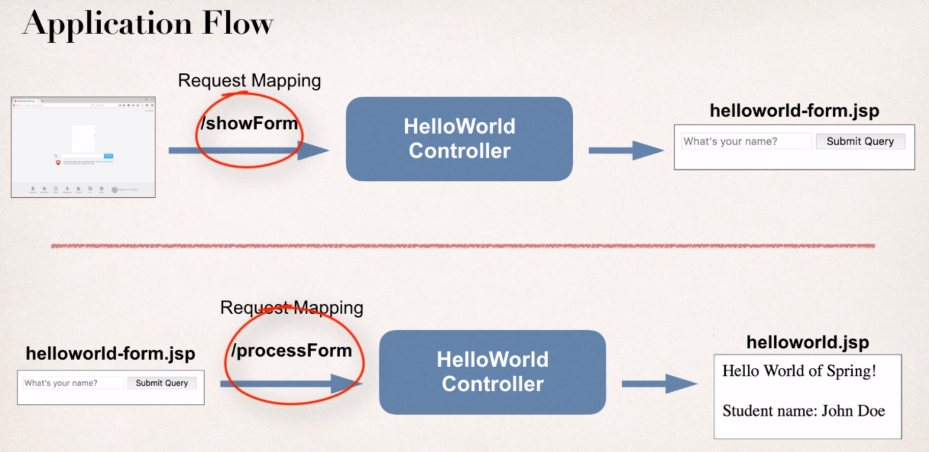
- helloworld-form.jsp페이지에서 name을 form으로 받아서 submit시키면 helloworld.jsp페이지에서 그 이름을 보여줄 것이다.

- /showForm RequestMapping을 한 HelloWorld Controller의 메소드를 통해서 helloworld-form.jsp를 보여줄 것이다.
그리고 form이 보여지고 정보를 입력후 submit버튼을 누르면, /processForm로 넘겨 줄 것이다. 이게 다시 HelloWorld Controller를 통해서 helloworld.jsp로 넘어간다.
하나의 HelloWorld Controller를 사용해 2개의 RequestMapping을 가질 것이다.

(1) 개발과정
1) Controller class 생성
2) HTML form 보여주기
- HTML Form을 보여주기 위해서 controller method 생성
- HTML form을 위한 View Page 생성
3) HTML form 진행시키기
- HTML Form을 진행하기 위해서 controller method 생성
- 확인을 위한 View Page 개발
(2) 코드예시
package com.luv2code.springdemo.mvc;

import javax.servlet.http.HttpServletRequest;

import org.springframework.stereotype.Controller;
import org.springframework.web.bind.annotation.RequestMapping;

@Controller
public class HelloWorldController {

	// need a controller method to show the initial HTML form

	@RequestMapping("/showForm")
	public String showForm() {
		return "helloworld-form";
	}

	//need a controller method to process the HTML form
	@RequestMapping("/processForm")
	public String processForm() {
		return "helloworld";
	}
}
<!DOCTYPE html>
<html>
<head>
<title>Hello World - Input Form</title>
</head>
<body>
	<form action="processForm" method="GET">

		<input type="text" name="studentName"
			placeholder="What's your name?"/>
		<input type="submit"/>

	</form>
</body>
</html>
<!DOCTYPE html>
<html>
<head>
<title>Confirmation page</title>
</head>
<body>
Hello World of Spring!
<br><br>
Student name : ${param.studentName}
</body>
</html>위와 같이 개발 과정 순서대로 진행하면 폼의 정보가 넘어간다.
포인트는 form tag의 action attribute에 submit시 이동되는 경로를 잘 설정해주는것, input field name 설정한 것을 JSTL을 이용해 ${param.필드명}을 통해 넘길 수 있다는 것이다.
3. Spring Model에 데이터 추가하는 방법
(1) Spring Model
1) Model은 application data를 위한 컨테이너이다.
2) Controller에서 무엇이든 model에 넣을 수 있다. (String, Object, 데이터베이스로 부터의 정보들 등등..)
3) View page(JSP)에서 model로 부터 데이터 접근을 할 수 있다.
(2) 코드예시
1) form data 진행을 위한 새로운 method를 만든다.
2) form data를 읽는다 : student's name
3) 학생 이름을 대문자로 바꾼다.
4) 대문자로 바꾼 이름을 Model에 추가한다.
다음 코드를 HelloWorldController에 추가한다.
	//new a controller method to read form data and
	//add data to the model
	@RequestMapping("/processFormVersionTwo")
	public String letsShoutDude(HttpServletRequest request, Model model) {

		// read the request parameter from the HTML form
		String theName = request.getParameter("studentName");

		// convert the data to all caps
		theName = theName.toUpperCase();

		// create the message
		String result = "Yo! " + theName;

		// add message to the model
		model.addAttribute("message",result);

		return "helloworld";
	}
- Controller method를 만들때 parameter수에 제한이 없다는것을 앞에 말했다. Controller code에 form data를 읽고자 한다면, httpServletRequest를 넘겨 줄 수 있다. (기능 : HTML 폼 데이터를 사용할 수 있다)
- getParameter("field name")을 통해 form data를 가지고 올 수 있다.
- Model이 처음에는 비어있지만, data를 추가 시키면 된다. addAttribute("name", result)의 형태로 data를 추가할 수 있다. 어떤 attribute name을 줘도 상관 없다.
<!DOCTYPE html>
<html>
<head>
<title>Confirmation page</title>
</head>
<body>
Hello World of Spring!
<br><br>
Student name : ${param.studentName}

<br><br>

The message : ${message}
</body>
</html>
이 model에 추가한 data를 view page에서 ${추가한 model이름}을 통해 사용할 수 있다.
'Programming > Spring & Hibernate' 카테고리의 다른 글
| Spring MVC - Form Tags and Data Binding (0) | 2021.02.09 |
|---|---|
| Spring MVC - Request Params & Requst Mappings (0) | 2021.02.09 |
| Spring MVC - Overview & Configuration (0) | 2021.02.08 |
| Spring Configuration with Java code (0) | 2021.01.31 |
| Bean Scope Annotation & Bean Life Cycle (0) | 2021.01.31 |
- Total
- Today
- Yesterday
