
티스토리 뷰
Hibernate CRUD features: Create, Read, Update and Delete
junojuno 2021. 3. 2. 11:551. Overview
(1)Hibernate 개발 과정
1) hibernate configuration file 추가
2) Java class에 annotation추가
3) database operation 수행을 위해 Java code 작성
앞의 게시물에서 Hibernate 개발 과정에서 볼수있듯, hibernate configuration file을 추가하고, Java class인 Student class에 annotation을 통해서 table과 class, column과 field를 각각 매핑시켰다.
이렇게 매핑한 Student class를 database operation을 수행하기 위해 자바코드를 작성하여 database에 CRUD 기능을 만들어 보고자 한다.
Sessionfactory와 session을 통해 database에 Student객체를 저장하고, 회수해오고, 수정하고, 삭제하는 과정을 알아보도록 하겠다.
2. Creating / Saving Java Objects
- 자바 객체의 생성 및 저장하는데에 있어서, 기본적으로 2개의 key player가 필요하다. 하나는 Session Factory이고 하나는 session이다.
(1) 자바 객체 생성 및 저장
1) SessionFactory :
- hibernate의 config file을 읽는다.
- database에 연결하여 session 객체를 만든다.
- heavy-weight객체이기 때문에 app에서 한번만 만들어지고, 일단 만들어 지면 계속해서 재사용된다.
- 만약 5개의 datasources나 database가 있으면 5개의 session factory instance를 만들어야 한다.
2) Session :
- 객체를 저장하고 회수하는데 사용되는 main object이다.
- SessionFactory와 다르게 light weight이다.
- 클라이언트/thread/하나의 transaction당 하나의 instance를 만든다
- Sessionfactory객체.getSessionFactory()를 통해서 열리고, session.close()를 통해서 닫힌다.
(2) 코드 예시
package com.luv2code.hibernate.demo;

import org.hibernate.Session;
import org.hibernate.SessionFactory;
import org.hibernate.cfg.Configuration;

import com.luv2code.hibernate.demo.entity.Student;

public class CreateStudentDemo {

	public static void main(String[] args) {

		//create session factory
		SessionFactory factory = new Configuration()
									.configure("hibernate.cfg.xml")
									.addAnnotatedClass(Student.class)
									.buildSessionFactory();

		// create session
		Session session = factory.getCurrentSession();

		try {

			// create a student object
			System.out.println("Creating new student object...");
			Student tempStudent = new Student("Paul", "Wall","paul@luv2code.com");

			// start a transaction
			session.beginTransaction();

			// save the student object
			System.out.println("Saving the student...");
			session.save(tempStudent);

			// commit transaction
			session.getTransaction().commit();

			System.out.println("Done!");

		} finally {
			factory.close();
		}
	}
}
- Session Factory를 만들때에, .configure() method를 통해서 config file을 넘겨주는데, 사실 .configure()로 쓸수 있다.
default값이 hibernate가 자동으로 hibernate.cfg.xml파일을 찾기 때문이다. 하지만 명확하게 표시해 주는것이 좋다.
- session.getTransaction().commit()를 통해서 commit을 하면 그 내용을 database에 저장한다.
그리고 실행 후, database를 확인해보면 data가 입력된것을 확인 할 수 있다.
(Database의 commit과 rollback에 대해서는 따로 포스팅을 해 두었다.)
3. Primary Key
(1) Primary Key(기본키)란 :
- table의 각 row을 고유하게 확인할 수 있다.
- 해당 테이블에서 Unique value이어야 한다.
- Null 값을 가질 수 없다.
- 예를들어 대학교 학생의 학번과 아이디 같이 겹치지 않는 unique한 값을 가지면서 null이지 않는 값을 Primary key라고 한다.
Primary Key(기본키)를 선정할 때, 크게 2가지 선택지가 있는데, 하나는 자연키(Natural Key)이고 하나는 대체키(Surrogate Key)이다.
자연키(Natural Key) : 전화번호, 이메일 처럼 비즈니스적으로 의미가 있는 키.
대체키(Surrogate Key) : 비즈니스와 상관없이 임의로 만들어진 키.
1) MySQL에서의 Primary Key 설정
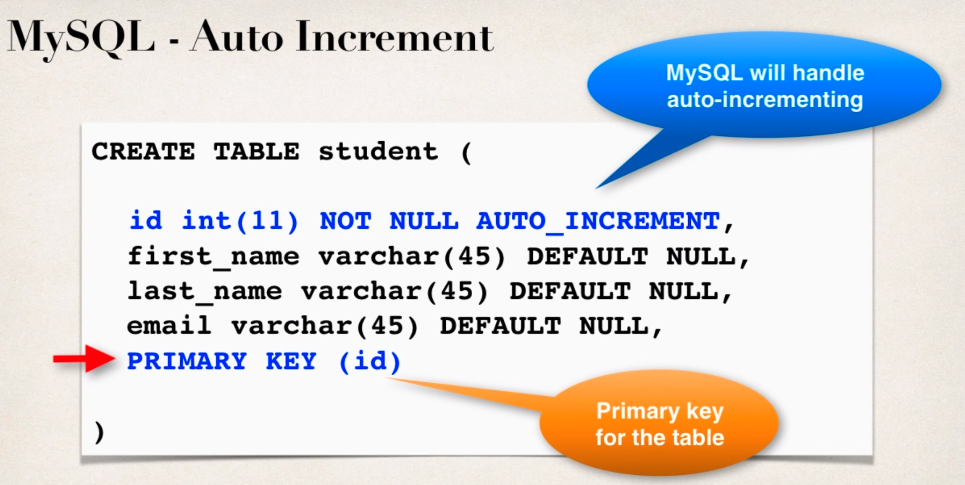
위와같은 코드를 통해 id에 NOT NULL, AUTO_INCREMENT를 통해 자동으로 증가하게 설정해주고 PRIMARY KEY를 설정해 줄수 있다.
2) Hibernate에서의 Primary Key 설정
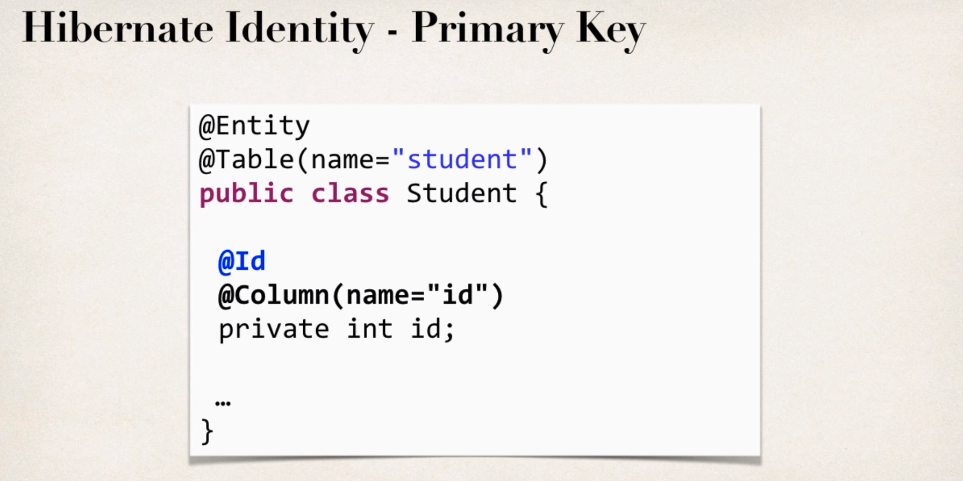
클래스에 annotation을 붙힐때, @Id를 통해서 Primary key를 설정할 수 있다. 이것을 통해 database가 primary key를 만들라고 놔두는 것이다. 하지만 여기서 더 명확히 하고 싶으면 그 primary key 생성을 어떻게 할지 알려줄수 있다.
여기선 @GeneratedValue(strategy=GenerationType.IDENTITY)를 통해서 MySQL이 AUTO_INCREMENT생성을 조절할 수 있도록 명시할 수 있다.
따라서 기본키를 자동으로 생성할 때에는 @Id와 @GeneratedValue 이 함께 사용 되어야 한다,
(2) ID Generation Strategies

ID generation strategy로 총 4가지가 있다.
1) AUTO : 기본 설정 값으로 각 데이터베이스에 따라 기본키를 자동으로 생성한다.
2) IDENTITY : 기본키 생성을 database에 위임한다. (예를들어 MySQL의 경우, AUTO_INCREMENT를 사용하여 기본키를 생성한다.)Id값을 따로 할당하지 않아도 데이터베이스가 자동으로 AUTO_INCREMENT를 하여 기본키를 생성해준다.
3) SEQUENCE : 만약 oracle과 같은 db를 사용한다면, oracle은 sequence의 개념이 있는데, 그것을 사용할 수 있다. database의 특별한 object sequence를 사용하여 자동으로 기본키를 생성한다. @SequenceGenerator 어노테이션이 필요하다.
4) TABLE : 키를 생성하는 테이블을 사용하는 방법으로 Sequence와 유사하다.
@TableGenerator 어노테이션이 필요하다.
TABLE 전략은 모든 데이터베이스에서 사용이 가능하지만 최적화 되어있지 않은 테이블을 사용하기 때문에 성능 문제에 이슈가 있다.
나중에 https://velog.io/@gudnr1451/GeneratedValue-%EC%A0%95%EB%A6%AC 사이트를 참고하자.
(3) Custom generation strategy 만들기
1) org.hibernate.id.IdentifierGenerator (Identifier generator interface)를 implement한다.
2) public Serializable generate(...) method를 override한다. 그리고 generate method안에 custom business logic을 적는다. (다음 ID가 뭔지 결정하는 business logic을 적고 그 value값을 return한다.
3) hibernate에 연결하면 hibernate가 나의 custom generator를 사용할 것이다.
※ 주의할 사항 :
① generator가 항상 unique value를 만들게 해야한다.
② 대량의, multi-threaded 환경에서 작동해야 한다.
③ 서버 클러스터나 서버 팜을 사용하고 있다면, 이 generator가 clustered 환경에서 unique value를 생성도록 확실히 해야한다.
* server cluser과 server farm이란
간단히 말해서 하나로 묶어 하나의 시스템같이 동작하게 함으로써 클러스터로 묶인 한 시스템에서 장애가 발생하면, 다른 정상적인 서버로 이동하여 사용자로 하여금 서버 기반 정보를 지속적이로 끊김없이 제공받을 수 있는 장점이 있다.
클러스터란 , 서버클러스터 정의하기
아무리 바빠도 한달에 한번이상은 자료를 업데이트 하려고했으나, 따로 준비하는게 생기면 하나올리기도 힘드네요.. ㅠㅠ 간만에 업데이트하는 내용은 클러스터로 했습니다. 많은 분들이 클러
allpartner.tistory.com
(4) AUTO-INCREMENT value를 변경하는 방법과 초기화 시키는 방법
1) AUTO-INCREMENT value를 변경하는 방법
: SQL문을 통해서 MySQL 데이터베이스를 변경할 수 있다.
예) ALTER TABLE hb_student_tracker .student AUTO_INCREMENT=3000 를 통해 3001부터 id값이 추가되게 된다.
2) AUTO_INCREMENT value를 1로 리셋하는 방법
: 마찬가지로 SQL문을 통해서 변경할 수 있다.
예) truncate hb_student_tracker.student 를 통해서 데이터 베이스의 정보를 지울 수 있다. (리셋함. 값들을 다 지우고 다음 save 통해서 Create할때 마다 1부터 id가 auto-increment하게 증가된다.
4. Read Java Objects
(1) Database로 부터 정보를 자바 객체로 가져오는 방법
// create Java Object
Student theStudent = new Student("Daffy", "Duck", "daffy@gmail.com");

// save it to database
session.save(theStudent);

// primary key를 이용해 database로 부터 다시 읽어오기(회수하기)
Student myStudent = session.get(Student.class, theStudent.getId());
: session.get(Student.class, theStudent.getId());를 통해서 해당 정보를 id값, 즉 primary key의 값으로 가져올 수 있다.
theStudent.getId()처럼 객체를 통해서 id값을 불러올수도, primary key value값을 직접 넣어 hard coding을 할 수있고, 메소드를 통해서 return되는 값을 출력하거나 사용할 수 있다.
성공한다면 해당 Student 객체를 반환할 것이고, 만약 object가 primary key를 찾지 못했다면 session.get()의 return 값으로 null을 반환할 것이고 이것을 application code에서 확인할 수 있다.
(2) 코드예시
package com.luv2code.hibernate.demo;

import org.hibernate.Session;
import org.hibernate.SessionFactory;
import org.hibernate.cfg.Configuration;

import com.luv2code.hibernate.demo.entity.Student;

public class ReadStudentDemo {

	public static void main(String[] args) {

		//create session factory
		SessionFactory factory = new Configuration()
									.configure("hibernate.cfg.xml")
									.addAnnotatedClass(Student.class)
									.buildSessionFactory();

		// create session
		Session session = factory.getCurrentSession();

		try {
			// use the session object to save Java object

			// create a student object
			System.out.println("Creating new student object...");
			Student tempStudent = new Student("Daffu", "Duck","daffy@luv2code.com");

			// start a transaction
			session.beginTransaction();

			// save the student object
			System.out.println("Saving the student...");
			System.out.println(tempStudent);
			session.save(tempStudent);

			// commit transaction
			session.getTransaction().commit();

			// MY NEW CODE (retrieving object from database)

			// find out the studnent's id : primary key
			System.out.println("Saved student. Generated id: " + tempStudent.getId());

			// now get a new session and start transaction
			// (Even if you're doing queries, you still make use of transactions)
			session = factory.getCurrentSession();
			session.beginTransaction();

			// retrieve student based on the id : primary key
			System.out.println("\nGetting student with id: " + tempStudent.getId());

			Student myStudent = session.get(Student.class, tempStudent.getId());

			System.out.println("Get complete : " + myStudent);

			// commit the transaction
			session.getTransaction().commit();

			System.out.println("Done!");

		} finally {
			factory.close();
		}
	}
}
- tempStudent객체를 database에 저장하고, 이것의 id값을 session.get(Student.class, id값)을 통해서 저장한 객체를 불러올 수 있다.
- 쿼리를 하더라도 transaction을 사용한다. (일반적인 SQL과 다르게, hibernate에서는 update와 read할때 항상 transaction을 사용한다. hibernate를 사용할 때, 쿼리를 할때 데이터를 읽어오기 위해서는 모두 transaction을 사용해야 한다는 것이다.
(3) Hibernate HQL를 이용해 객체 Quering하는법
- 특정한 조건을 만족하는 객체를 쿼리할 수 있다.
- Hibernate Query Language(HQL)을 통해서 쿼리한다.
1) HQL이란
- 객체 회수를 위한 Query 언어이다.
- SQL과 본질적으로 비슷하다. (where, like, order by, join, in etc..와 같은 SQL 언어에서 볼수 있는것을 이용해 쿼리한다)
2) 코드예시
package com.luv2code.hibernate.demo;

import java.util.List;

import org.hibernate.Session;
import org.hibernate.SessionFactory;
import org.hibernate.cfg.Configuration;

import com.luv2code.hibernate.demo.entity.Student;

public class QueryStudentDemo {

	public static void main(String[] args) {

		//create session factory
		SessionFactory factory = new Configuration()
									.configure("hibernate.cfg.xml")
									.addAnnotatedClass(Student.class)
									.buildSessionFactory();

		// create session
		Session session = factory.getCurrentSession();

		try {

			// start a transaction
			session.beginTransaction();

			// query students
			List<Student> theStudents = session.createQuery("from Student").getResultList();
			// hibernate로 database를 query해서 모든 student object의 리스트를 준다.

			// display the students
			displayStudents(theStudents);

			//query students: lastName="Doe"
			theStudents = session.createQuery("from Student s where s.lastName='Doe'").getResultList();

			// display the students
			System.out.println("\n\nStudents who have last name of Doe");
			displayStudents(theStudents);

			// query students: lastName='Doe' OR firstName='Daffu'
			// s.lastName앞에 공백있는것 유의.
			theStudents =
						session.createQuery("from Student s where"
								+ " s.lastName='Doe' OR s.firstName='Daffu'").getResultList();

			// display the students
			System.out.println("\n\nStudents who have last name of Doe OR first name Daffu");
			displayStudents(theStudents);

			// query students whare email LIKE '%gmail.com'
			theStudents = session.createQuery("from Student s where "
					+ "s.email LIKE '%gmail.com'").getResultList();

			// display the students
			System.out.println("\n\nStudents whose email ends with luv2code.com");
			displayStudents(theStudents);


			// commit transaction
			session.getTransaction().commit();

			System.out.println("Done!");

		} finally {
			factory.close();
		}
	}

	private static void displayStudents(List<Student> theStudents) {
		for (Student tempStudent : theStudents) {
			System.out.println(tempStudent);
		}
	}

}
- displayStudents라는 mehtod를 만들어서 List로 받아온 Student객체를 하나씩 출력해준다.
- from Student를 통해 Student객체를 모두 가지고 온다.
- where절이나 like절 같은 경우도 alias(별칭. 여기서 s)를 설정해 줌으로서 직관적으로, 간결하게 가지고 올 수 있다.
5. Update Java Objects
(1) Hibernate를 이용한 객체 Update.
1) Read와 마찬가지로 primary key를 통해 student객체를 가져온다.
- Primary key로 student object를 database로부터 회수한다.
2) setter를 통해서 회수한 객체의 내용을 update시켜준다. 바꾸면 메모리에서만 바꿔지는데, transaction을 commit시키면 database의 information에 적용이 된다.
(2) 코드 예시
package com.luv2code.hibernate.demo;

import java.net.SocketTimeoutException;

import org.hibernate.Session;
import org.hibernate.SessionFactory;
import org.hibernate.cfg.Configuration;

import com.luv2code.hibernate.demo.entity.Student;

public class UpdateStudentDemo {

	public static void main(String[] args) {

		//create session factory
		SessionFactory factory = new Configuration()
									.configure("hibernate.cfg.xml")
									.addAnnotatedClass(Student.class)
									.buildSessionFactory();

		// create session
		Session session = factory.getCurrentSession();

		try {
			int studentId = 3;

			// now get a new session and start transaction
			session = factory.getCurrentSession();
			session.beginTransaction();

			// retrieve student based on the id : primary key
			System.out.println("\nGetting student with id: " + studentId);

			Student myStudent = session.get(Student.class, studentId);

			System.out.println("Updating student...");
			myStudent.setFirstName("Scooby");

			// commit the transaction
			session.getTransaction().commit();

			// NEW CODE
			session = factory.getCurrentSession();
			session.beginTransaction();

			// update email for all students
			System.out.println("Update email for all students");
			session.createQuery("update Student set email='foo@gmail.com'")
				.executeUpdate();

			// commit the transaction
			session.getTransaction().commit();

			System.out.println("Done!");

		} finally {
			factory.close();
		}
	}

}
- session.save나 session.update같은 메소드로 명확히 해주지 않는 이유는 회수한 student객체가 database에서 회수한 persistent객체이기 때문이다. 그래서 setter로 바꿔주고 commit만 하면 된다. (session.save()를 통해서 객체 넘기고 commit해도 적용되는것은 똑같다.)
* persistent object이란 무엇인가?
- Transient object state : new operator를 이용해 인스턴스화된 객체이고, Hibernate의 Session과 연관되지 않은 객체이다. database을 나타내지 않고 할당받은 id값 또한 없다. Hibernate의 Session을 통해서 persistent object로 만들 수 있다.
- Persistent object이란 : database의 테이블의 row을 나타내는 POJO클래스의 인스턴스이다. 이것은 Session의 범위에서의 정의에 의해 저장되고 로드되는것이 결정된다. Hibernate가 persistent state에 있는해당객체에 만들어진 어떠한 변화를 감지할것이고 한 작업의 단위가 완료될때 상태를 동기화 시킬것이다. 따라서 Session이 종료되면서 동기화를 시켜주기 때문에 session.update라고 명시해 줄 필요가 없는것이다.
(Hibernate에서 다루는 객체 상태 - Transient, Persistent, Datached는 나중에 나중 포스트에서 다시 다루니 넘어가자..)
즉 Read / Update 할때에는, (Delete도 마찬가지)
1) session.get()을 통해 해당 PK에 대응하는 Persistent object를 받아서 하나하나 읽어오고, 읽어온것을 setter를 통해 update할 수도 있고,
2) HQL을 사용하여 List 형태로 조건에 맞는 여러 Persistent object를 받아 와서 .getResultList()를 통해 List<persistent object)>로 자바 객체로 가지고 올 수도 있고, .executeUpdate()를 통해서 HQL 조건에 맞게끔 한번에 update 시킬수도 있다.
6. Delete Java Objects
(1) Hibernate를 이용한 객체 Delete.
1) Primary key를 통해 객체를 회수 하고 회수한것을 session.delete() 를 통해서 삭제하고 commit하거나
session.createQuery().executeUpdate()를 통해서 HQL을 사용해서 즉각해서 지울 수 있다.
(2) 코드 예시
package com.luv2code.hibernate.demo;

import org.hibernate.Session;
import org.hibernate.SessionFactory;
import org.hibernate.cfg.Configuration;

import com.luv2code.hibernate.demo.entity.Student;

public class DeleteStudentDemo {

	public static void main(String[] args) {

		//create session factory
		SessionFactory factory = new Configuration()
									.configure("hibernate.cfg.xml")
									.addAnnotatedClass(Student.class)
									.buildSessionFactory();

		// create session
		Session session = factory.getCurrentSession();

		try {
			int studentId = 1;

			// now get a new session and start transaction
			session = factory.getCurrentSession();
			session.beginTransaction();

			// retrieve student based on the id : primary key
			System.out.println("\nGetting student with id: " + studentId);

			Student myStudent = session.get(Student.class, studentId);

			// delete the student
			//System.out.println("Deleting student: " + myStudent);
			//session.delete(myStudent);

			// delete student id =2
			System.out.println("Deleting student id=2");
			session.createQuery("delete from Student where id=2").executeUpdate();

			// commit the transaction
			session.getTransaction().commit();

			System.out.println("Done!");

		} finally {
			factory.close();
		}
	}
}
- 위에서 볼수 있듯, primary key로 지울 객체를 가지고 와서 session.delete()를 통해 지울 수도 있고, session.createQuery().executeUpate()를 통해 바로 지울 수도 있다.
- .executeUpdate()는 포괄적인 이름으로써 해당 database를 update할 수 있다. 그 update는 update statement나 delete가 될 수 있다.
* 'Update시 session.save()를 안하는 것이 PK로 session.get()를 통해서 가지고 온 객체가 Persistent 객체이기 때문이다 '에 대한 부연 설명
session.save()는 데이터베이스에 존재하지 않기 때문에 등록시켜 주는 것이다. 하지만 update를 시키고 싶다면, 이미 데이터베이스에 존재하는 객체를 가지고 와서 바꿔주고(setter) 데이터베이스에 그것을 새로 저장하는 것이 아니라 그 데이터베이스와 연결된 자바 객체(persistent object)를 바꿔주고 커밋만 하면 되는것이다.
방에 그림이 있고, 그 그림의 하늘을 하늘색에서 회색으로 바꿔주고 싶다면, 그림을 가지고 오고(session.get()) 하늘의 색을 바꿔주고(setter), 다시 벽에 걸면 되는것과 같다.(commit)
*Hibernate로 날짜를 읽어 오는 방법
command-line에서 date string을 읽어와서 데이터베이스에 date로서 저장하는 방법.
-> 자바 date formatiing 클래스와 hiberante 어노테이션을 통해서 이용할 수 있다.
총 프로세스
1) 위 예시의 student 객체의 데이터베이스 테이블을 바꾼다.
2) date를 자르고 설정할수 있는 클래스인 date utils 클래스를 추가한다.
3) Student 클래스에 date 필드를 추가한다.
4) 확인을 위해 Student 클래스의 toString 클래스를 추가한다.
5) CreateStudentDemo(위 클래스)를 update한다.
1) "date_of_birth"라는 새로운 컬럼을 데이터베이스 테이블에 추가한다

그리고 SELECT를 해보면 다음과 같이 date_of_birth 컬럼이 추가 된 것을 확인 할 수 있다.

2) date를 자르고 설정할수 있는 클래스인 date utils 클래스를 추가한다.
DateUtils 클래스가 필요한데, 다음과 같은 클래스를 해당 패키지에 추가한다.
import java.text.ParseException;
import java.text.SimpleDateFormat;
import java.util.Date;

public class DateUtils {

    // The date formatter
    // - dd:   day in month (number)
    // - MM:   month in year (number)
    // - yyyy: year
    //
    // See this link for details: https://docs.oracle.com/javase/tutorial/i18n/format/simpleDateFormat.html
    //
    //
    private static SimpleDateFormat formatter = new SimpleDateFormat("dd/MM/yyyy");

    // read a date string and parse/convert to a date
    public static Date parseDate(String dateStr) throws ParseException {
        Date theDate = formatter.parse(dateStr);

        return theDate;
    }

    // read a date and format/convert to a string
    public static String formatDate(Date theDate) {

        String result = null;

        if (theDate != null) {
            result = formatter.format(theDate);
        }

        return result;
    }
}
3) Student 클래스에 date 필드를 추가한다.
4) 확인을 위해 Student 클래스의 toString 클래스를 추가한다.
	@Column(name="date_of_birth")
	@Temporal(TemporalType.DATE)
	private Date dateOfBirth;

    public Student( String firstName, String lastName, String email, Date theDateOfBirth) {
		this.firstName = firstName;
		this.lastName = lastName;
	    this.email = email;
	    this.dateOfBirth = theDateOfBirth;
	}

    public Date getDateOfBirth() {
		return dateOfBirth;
	}
	public void setDateOfBirth(Date dateOfBirth) {
		this.dateOfBirth = dateOfBirth;
	}
	@Override
	  public String toString() {
	       return "Student [id=" + id + ", firstName=" + firstName + ", lastName=" + lastName + ", email=" + email
	                + ", dateOfBirth=" + DateUtils.formatDate(dateOfBirth) + "]";
	}
5) CreateStudentDemo(위 클래스)를 update한다.
String theDateOfBirthStr = "31/12/1998";
Date theDateOfBirth = DateUtils.parseDate(theDateOfBirthStr);

Student tempStudent = new Student("Pauly", "Doe", "paul@luv.com", theDateOfBirth);
실행하면 theDateOfBirthStr인 string값을 읽어서 date로 자르고 전환하는 것을 볼 수 있다.
6) 실행결과

Reference :
udemy - chad darby의 spring & hibernate for beginner course 수강
https://velog.io/@gudnr1451/GeneratedValue-%EC%A0%95%EB%A6%AC
'Programming > Spring & Hibernate' 카테고리의 다른 글
| SpringBoot를 command line을 통해서 실행하기 (0) | 2022.07.25 |
|---|---|
| Hibernate Advanced Mappings Overview (0) | 2021.03.04 |
| Hibernate Configuration with Annotations (0) | 2021.02.26 |
| Hibernate Overview & Setting Up Development Environment (0) | 2021.02.26 |
| Spring MVC Form Validation - Custom Validation Rule 만들기 (0) | 2021.02.18 |
- Total
- Today
- Yesterday