
티스토리 뷰
1. Unit testing의 장점
Unit test의 필요성은 의심의 여지가 없다. 장점이 너무 많기 때문이다.
(1)간결하게 말하자면, 유닛 테스트는 빠르게 문제가 발생한 것을 확인할 수 있고, 빠르게 고칠수 있다.
버그를 찾는데 더 적은 자원이 소비되기 때문에, 팀은 프로젝트의 다음 단계로 옮겨갈 수 있다.
유닛 테스트를 작성하면, 소프트웨어 건설 단계에서 많은 버그가 발견되기 때문에 다음 단계로 버그가 이동하는 것을 막아준다. 결과적으로 많은 시간과 자원을 아낄 수 있는 것이다.
(2) 또한, 유닛 테스트는 프로덕트의 살아있는 documentation이다. 유닛 테스트는 적절/부적절한 소프트웨어 컴포넌트의 사용 정보를 가지고 있는 지표이기 때문에, 이려한 지표를 통해 완벽한 documentation을 제공할 수 있다.
(3) Reusable & Reliable
유닛테스트 환경안에서, 각 프로덕트의 모듈은 각 책임의 영역이 있고 서로 분리되어 있기 때문에, 더욱 믿을만 하다.
또한 제한된 환경안에서 테스트 되었기 때문에 재사용가능하다. 깨끗하고, 효율적이고 지속적인 이 모든 것이 유닛테스트로 가속화 될 수 있다.
(4) 성능 측정을 도와준다.
유넷 테스트는 존재하지 않는 문제에 대한 해결책을 찾는 불필요한 노력을 방지한다.
예를들어, 해시 리스트에서 작업하는 경우, 리스트가 커지면 어떻게 수행되는지 확인해야 할 수 도 있다. 이때 유닛테스트를 적용해서 다양한 경우의 시나리오를 확인할 수 있다.이 과정에서 특정 값의 개수를 초과하지 않음을 확인하였다면, 더 많은 테스트에 시간을 할애햐지 않아도 된다.
(5) 코드 커버리지 증가
위에서 확인할 수 있듯, 유닛 테스트는 처음에 지루한 프로세스라고 부여질 수도 있지만, 길게 본다면 이익은 확실하다.
유닛 테스트는 모든 코드가 deploy 되기 전에 특정 퀄리티 기준을 만족시키는 것을 확실시하기 때문이다.
2. Junit5란
자바 개발자가 가장 많이 사용하는 테스팅 프레임워크이다.
Junit4는 하나의 jar파일에 다른 라이브러리들을 참조 했다면, Junit5는 자체로 여러 모듈화가 되어 있다.
크게 Junit5는 아래와 같이 세 개의 모듈로 이루어져 있다.

위 Junit 플랫폼은 main 메서드 없이 콘솔로 실행가능하게 해주는 테스트 실행 런처를 제공하고, TestEngine API를 제공한다. Jupiter와 Vintage는 Junit Platform에서 제공하는 TestEngine API의 구현체로, Jupiter는 Junit5를 제공하고, Vintage는 Junit 3,4를 지원한다.
테스트는 setup -> execute -> assert 과정으로 진행 되는데, setup 단계에서는 instance를 생성하고, execute 단계에서는 테스트할 메서드를 호출하고, assert 단계에서는 기대값과 실제 값을 비교해 검증한다.
3. 기본 Annotation
(1) @Test
테스트 메서드로 인식하고 테스트의 대상이 된다.
(2) @BefreAll / @AfterAll
@BeforeAll
static void setupBeforeEachClass() {
    System.out.println("@BeforeAll executes only once before all test methods execution in the class");
}

@AfterAll
static void tearDownAfterAll() {
    System.out.println("@AfterAll executes only once after all test methods execution in the class");
}
1) @BeforeAll : 모든 테스트 전 한번의 setup이다.
DB connection을 가지고 오거나, remote sercer에 연결할때 주로 사용한다.
2) @AfterAll : 모든 테스트 실행 후 한번 실행된다.
주로 DB connection을 release하거나, disconnect 할 때 사용된다.
이때 주의할 점이, default로 각 테스트 메서드 실행 시 테스트 간 의존성을 없애기 위해 하나의 클래스 인스턴스가 아닌 새로운 인스턴스를 생성 해 동작하기 때문에, 클래스 레벨에서 실행되기 위해 static을 반드시 붙혀줘야 한다.
return 타입은 없어야 하고, modifier로 private는 안되지만 default는 가능하다.
(3) @BeforeEach / @AfterEach
@AfterEach
void tearDownAfterEach() {
    System.out.println("Running @AfterEach");
    System.out.println();
}
1) @BeforeEach : 각 테스트 메서드 실행 전에 실행됨
따라서 common set up code, 객체 생성, data setup에 주로 사용된다.
2) @AfterEach : 각 테스트 메서드 실행 후에 실행된다.
주로 common cleanup code의 기능으로 사용된다.
(4) @Disabled
테스트를 실행하고 싶지 않은 메서드에 @Disabled를 적용하면 테스트 대상에서 제외된다.
4. 테스트 이름 표시하기
(1) @DisplayName
custom display name을 설정 할 수 있다.
어떤 테스트인지 테스트 이름을 보다 쉽게 표현할 수 있는 방법을 제공하는 어노테이션이다.
(2) @DisplayNameGeneration
Junit이 이름을 만들어 주기를 바랄때 사용하며 메서드와 클래스 레퍼런스를 사용해 테스트 이름을 표기하는 방법을 설정한다.
기본 구현체로 ReplaceUnderscores를 제공하는데, 테스트 이름을 설정할때 보통 snake 표기법을 사용하는데 underscore를 띄어쓰기로 대체한다.
Jupiter에서 제공하는 Generator는 다음과 같다.

1) Simple
@DisplayNameGeneration(DisplayNameGenerator.Simple.class)
기본적으로 테스트 메서드 + ()를 이름으로 갖는데, 테스트 메서드에서 괄호를 제거해 이름으로 갖는다.
2) ReplaceUnderscores
@DisplayNameGeneration(DisplayNameGenerator.ReplaceUnderscores.class)테스트 메서드에서 _를 공백으로 치환한다.
3) IndicativeSentences
@DisplayNameGeneration(DisplayNameGenerator.IndicativeSentences.class)클래스 이름(DisplayName)과 테스트 메서드 이름을 이어 문장으로 만들어 준다. separator가 기본적으로는 comma 이나, 설정할 수 있다.
class DisplayNameGeneratorDemo {

    @Nested
    @DisplayNameGeneration(DisplayNameGenerator.ReplaceUnderscores.class)
    class A_year_is_not_supported {

        @Test
        void if_it_is_zero() {
        }

        @DisplayName("A negative value for year is not supported by the leap year computation.")
        @ParameterizedTest(name = "For example, year {0} is not supported.")
        @ValueSource(ints = { -1, -4 })
        void if_it_is_negative(int year) {
        }

    }

    @Nested
    @IndicativeSentencesGeneration(separator = " -> ", generator = DisplayNameGenerator.ReplaceUnderscores.class)
    class A_year_is_a_leap_year {

        @Test
        void if_it_is_divisible_by_4_but_not_by_100() {
        }

        @ParameterizedTest(name = "Year {0} is a leap year.")
        @ValueSource(ints = { 2016, 2020, 2048 })
        void if_it_is_one_of_the_following_years(int year) {
        }

    }

}
결과)

* Junit은 camel case에 대한 built in generator를 제공하지 않는다. 하지만 검색을 통해서 찾을 수 있다.
참고 : https://leeturner.me/posts/building-a-camel-case-junit5-displaynamegenerator/
테스트 이름을 설정할 수 있는 위 두가지 방법이 있지만, @DisplayName이 우선순위가 더 높고, 메서드 이름이 길어 질 수 있기 때문에 @DisplayName 사용을 권장한다.
5. Assertion
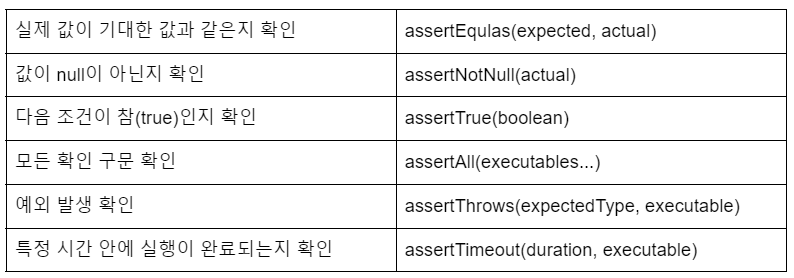
(1) Assertion의 기본적인 구조
assert*(expected, actual, supplier<String> message)
// Assertions.class
public static void assertEquals(Short expected, Short actual, String message) {
    AssertEquals.assertEquals(expected, actual, message);
}

public static void assertEquals(short expected, short actual, Supplier<String> messageSupplier) {
    AssertEquals.assertEquals(expected, actual, messageSupplier);
}
위를 본다면 string값을 넘길수도, supplier를 통해 string을 넘길 수도 있다.
람다식을 사용한다면, message 문자열 연산비용이 test 통과시 발생하지 않는다.
message를 string으로 넘긴다면 그냥 string은 test 통과시에도 연산이 발생한다.
(이는 supplier의 lazy evaluation과 관련이 있다)
(2) assertAll()
public static void assertAll(Executable... executables)위 Executable은 Junit에 정의되어 있는 함수형 인터페이스이다.
Runnable 인터페이스와 비슷하지만 Executable은 모든 종류의 exception을 던질 수 있다.
assert문은 순차적으로 실행되는데, 중간에 실패하면 그 이후 assert 문은 통과했는지 실패했는지 모른다.
따라서 여러개의 assertion이 있다면 assertAll()을 통해서 람다식으로 묶어줄 수 있다.
@Test
    void groupedAssertions() {
        // In a grouped assertion all assertions are executed, and all
        // failures will be reported together.
        assertAll("person",
            () -> assertEquals("Jane", person.getFirstName()),
            () -> assertEquals("Doe", person.getLastName())
        );
    }
(3) assertTimeout(duration, executable)
: 단점은 테스트 메서드 내부 코드가 모두 실행할 때 까지 기다려야 한다.
예를들어, duration보다 내부 코드 실행시간이 초과되더라도, 초과하는 순간 테스트가 fail 되는 것이 아니라 내부 코드가 모두 실행 후 실행 시간을 duration과 비교하는 것이다.
(4) assertTimeoutPreemptively(Duration timeout, Executable executable)
public static void assertTimeoutPreemptively(Duration timeout, Executable executable) {
    AssertTimeout.assertTimeoutPreemptively(timeout, executable);
}
위 assertTimeout의 단점을 보완하고자, duration 초과시 바로 테스트가 종료된다.
하지만 주의해서 사용해야 하는데, ThreadLocal 사용하는 코드가 있다면 예상치 못한 결과가 발생할 수 있기 때문에 Thread와 관련된 코드를 실행하는지 확인해야 한다.
따라서 db와 연결할 때, 기본적인 설정대로 rollback이 되지 않고, db에 반영이 될 수도 있다. (transaction thread와 별개의 thread로 실행하기 때문에)
(5) assertSame과 assertEqual의 비교
1) assertSame(Object expected, Object actual, Supplier<String> messageSupplier)
: 객체 reference를 참조해 두 객체를 비교한다.
2) assertEquals(Short expected, Short actual, Supplier<String> messageSupplier)
: 두 객체가 같은지 비교한다 (값비교)
이 외에도 assertTrue, assertFalse, 지난번에 정리한 assertIterableEquals, assertLineMatch, 그리고 assertArrayEquals, assertThrows 등이 있다.
6. 조건에 따라 테스트 실행하기
테스트가 특정 자바 버전이나 range에서 작동해야 할때, 특정 os에서만 작동하는 테스트, 특정 환경변수나 시스템 properties에서만 작동되도록 설정할 수 있다.
(1) Assumptions
assumption을 이용해 특정 조건에 충족하면 테스트를 실행하도록 설정할 수 있다.
@Test
    void testOnlyOnDeveloperWorkstation() {
        assumeTrue("DEV".equals(System.getenv("ENV")),
            () -> "Aborting test: not on developer workstation");
        // remainder of test
    }

    @Test
    void testInAllEnvironments() {
        assumingThat("CI".equals(System.getenv("ENV")),
            () -> {
                // perform these assertions only on the CI server
                assertEquals(2, calculator.divide(4, 2));
            });

        // perform these assertions in all environments
        assertEquals(42, calculator.multiply(6, 7));
    }
특정 조건에 따라 테스트를 실행할 수도 있고, 조건에 맞지 않으면 메세지를 출력하게 설정할 수 있다.
(2) Annotation 이용
@Enabled___ 와 @Disabled___
- OnOS
- OnJre
- ForJreRange
- IfSystemProperty
- IfEnvironmentVariable
예시 )
@Test
@EnabledOnOs(OS.LINUX)
void testForLinuxsOnly() {
    // execute method and perform asserts
}

@Test
@EnabledOnOs({OS.WINDOWS, OS.MAC})
void testForMacAndWindowsOnly() {
    // execute method and perform asserts
}

@Test
@EnabledOnJre(JRE.JAVA_17)
void testForOnlyJava17() {
    // execute method and perform asserts
}
7. 태깅과 필터링
테스트를 그룹화 해서 모듈별로 실행할 수 있게 설정할 수 있다.
@Tag("fast")
@Tag("model")
class TaggingDemo {

    @Test
    @Tag("taxes")
    void testingTaxCalculation() {
    }

}
@Tag를 통해 이름을 설정하고, edit configuration > test kind를 class가 아닌 tags로 설정하고 match하는 expression을 입력하면 그것만 실행한다.
command 에서 테스트를 실행하는 경우, pom.xml에 <profile>을 통해 설정할 수 있는데 이는 생략
8. Custom tag
Junit5가 제공하는 annotation은 meta annotation으로 사용할 수 있다.
따라서 composed annotation으로 만들어 사용할 수 있다.
-> custom annotation 만들때 그냥 붙히면 그걸 사용가능하다는 것이다..
9. 테스트 반복하기
(1) @RepeatedTest
- 반복 횟수와 반복 테스트 이름을 설정할 수 있다. (displayName, currentRepetition, totalRepetitions 통해서)
- {displayName}: display name of the @RepeatedTest method
- {currentRepetition}: the current repetition count
- {totalRepetitions}: the total number of repetitions
@RepeatedTest(10)
void repeatedTest() {
    // ...
}
결과 )
위를 이용해 다음과 같이 출력할 수 있다.
INFO: About to execute repetition 1 of 10 for repeatedTest
INFO: About to execute repetition 2 of 10 for repeatedTest
INFO: About to execute repetition 3 of 10 for repeatedTest
INFO: About to execute repetition 4 of 10 for repeatedTest
...
(2) @ParameterizedTest
- @ValueSource를 통해 문자열을 넘겨줄 수 있는데, 클래스, long, int 등 다양한 값을 넘겨 줄 수 있다.
- @CsvSource를 이용하면 comma를 통해 여러 인자를 넘겨 줄 수 있다.
- @NullAndEmptySource(@NullSource + @EmptySource) 통해서 비어있는 문자열, null 을 넘겨 줄 수 있다.
- @CsvFileSource를 통해 csv 파일의 value를 읽을수 있다.
- @EnumSource를 통해 enum constant value를 전달할 수 있다.
- @MethodSource 를 통해 제공하는 value에 대한 custom method를 만들 수 도 있다.
예시 )
@ParameterizedTest
@ValueSource(strings = { "racecar", "radar", "able was I ere I saw elba" })
void palindromes(String candidate) {
    assertTrue(StringUtils.isPalindrome(candidate));
}
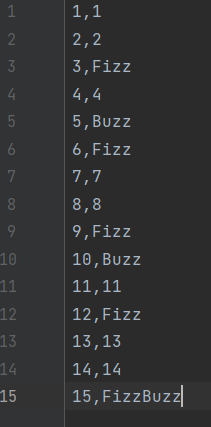
@ParameterizedTest(name = "value={0}, expected={1}")
@CsvFileSource(resources = "/small-test-data.csv")
@Order(5)
@DisplayName("Testing with Small data file")
void testSmallDataFile(int value, String expected) {
    assertEquals(expected, FizzBuzz.compute(value));
}
이때 인자 값의 타입을 변환해주는 인터페이스가 있는데,
암묵적으로 문자열을 내가 받고자 하는 타입으로 기본적으로 변환해준다.
(1) 암묵적 conversion
Argument를 암묵적으로 변환하는 것은 다음 문서를 참고하자
JUnit 5 User Guide
Although the JUnit Jupiter programming model and extension model do not support JUnit 4 features such as Rules and Runners natively, it is not expected that source code maintainers will need to update all of their existing tests, test extensions, and custo
junit.org
(2) 명시적 conversion
반면 내가 custom한 type으로 받고 싶으면 SimpleArgumentConverter 구현체를 만들면 된다. @ConvertWith 이라는 annotation으로 해당 구현 객체를 넘겨 줘야 하며, ArgumentConverter는 하나의 타입에만 적용된다.
두개의 argument를 받을 때는 원래 void parameterizedTest(arg1, arg2)를 받으면 되지만, custom한 type으로 받고 싶다면, aggregator를 사용해 하나로 만들어야 한다.
ArguemntAccessor을 사용하거나 custom Aggregator를 만들고 @AggregateWith annotation을 통해서 구현 객체를 넘겨주면 된다.
argumentconverter는 하나의 argument에 대한 것이며, aggregator는 여러 argument를 받을 때 사용한다.
주의할 점이 aggregator는 반드시 static inner 클래스거나 public 클래스여야 한다.
자세한 내용은 다음을 참고하자.
JUnit 5 User Guide
Although the JUnit Jupiter programming model and extension model do not support JUnit 4 features such as Rules and Runners natively, it is not expected that source code maintainers will need to update all of their existing tests, test extensions, and custo
junit.org
10. 테스트 인스턴스
Junit이 테스트 실행할 때, 메서드 실행하려면 클래스 인스턴스를 만들어야하는데, 테스트 마다 인스턴스를 생성하는것이 기본 전략이다.
따라서 클래스 테스트의 인스턴스 변수를 조작한다 하더라도 각 인스턴스를 만들기 때문에 테스트 메서드 사이에 영향을 받지 않는다. 테스트 간의 의존성을 없애기 위해서 그런것이다.
하지만 테스트 클래스 인스턴스를 테스트 메서드마다 만드는 것이 아닌 공유하는 방법도 있다.
@TestInstance(TestInstance.Lifecycle.PER_CLASS)를 클래스에 붙히면 되는데, 조금 성능적인 장점이 있을수도 있고 제약이 느슨해 질수도 있다.
이때는 @BeforeAll, @AfterAll이 static 일 필요가 없어 지게 된다. (static으로 만들지 않아도 인스턴스가 한번만 만들어 지기 때문이다. 위 내용 참고.)
- 경우에 따라, 테스트 간에 공유하는 모든 상태를 @BeforeEach 또는 @AfterEach에서 초기화 할 필요가 있다.
- @BeforeAll과 @AfterAll을 인스턴스 메소드 또는 인터페이스에 정의한 default 메소드로 정의할 수도 있다.
그럼 언제 이렇게 인스턴스를 하나만 만드는 것이 유용할까?
11. 테스트의 순서
정해진 순서가 내부적인 로직이 있지만 이를 의존해 테스트 메서드를 작성해서는 안된다.
순서를 명확히 드러내지 않는 이유는 단위 테스트가 다른 단위테스트와는 독립적으로 실행되어야 하기 때문이다.
junit doc에 따르면 default로 테스트 클래스 / 메서드가 internally non-obvious한 알고리즘을 통해 정렬되어 있다.
order가 undocumented 되어 있기 때문에 manual하게 순서를 특정해야 한다.
이렇게 순서를 지정하는 경우는, integration test, functional test, scenario test 또는회원 가입 -> 로그인 -> 개인페이지 이동 같이이런 use case 테스트 하는 경우 stateful하게 상태정보 유지하면서 테스트간 의존성도 있고 데이터 공유하려면 테스트의 인스턴스를 하나만 만들어 공유해야한다.
설정하는 방법은 아래와 같이 @TestMethodOrder에 MethodOrderer의 구현체를 넘겨주면 된다.
그러면 테스트 메서드에 붙은 @Order를 통해 정해진 순서에 따라 테스트가 실행된다.
@Order 통해 지정하는 숫자가 낮을수록 우선순위가 높고, 중복시 원래 기본 정렬순서가 적용된다.
@TestMethodOrder(MethodOrderer.OrderAnnotation.class)예시)
 @Test
    @Order(1)
    @DisplayName("Divisible by Three")
    void testForDivisibleByThree() {
//        fail("fail");
        String expected = "Fizz";
        assertEquals(expected, FizzBuzz.compute(3), "Should return Fizz");
    }

    @Test
    @Order(2)
    @DisplayName("Divisible by Five")
    void testForDivisibleByFive() {
        String expected = "Buzz";
        assertEquals(expected, FizzBuzz.compute(5), "Should return Buzz");
    }
-> @Order(1) 테스트 -> @Order(2) 순으로 테스트가 실행된다.
이외에도 MethodOrderer 구현체를 알파벳 이름 순으로, 혹은 랜덤으로 순서를 지정하는 Alphanumeric, Random을 지정할 수도 있다.
12. Junit을 junit-platform.properties 파일을 통해 설정하기
test 디렉토리 아래 resources 폴더를 만든 다음 junit-platform.properties 파일을 만들면 된다.
그리고 project structure > module > resources 디렉토리를 test Resources 디렉토리로 설정한다.
- 테스트 인스턴스 라이프사이클 설정 : junit.jupiter.testinstance.lifecycle.default = per_class (기본은 per_method)
- 확장팩 자동 감지 기능 : junit.jupiter.extensions.autodetection.enabled = true (기본은 false)
- @Disabled 무시하고 실행하기 : junit.jupiter.conditions.deactivate = org.junit.*DisabledCondition (패키지 경로)
- 테스트 이름 표기 전략 설정 : junit.jupiter.displayname.generator.default = \ org.junit.jupiter.api.DisplayNameGenerator$ReplaceUnderscores (그래도 DisplayName이 우선순위 더 높음)
( \의 의미는 CR LF)
Reference :
Unit test의 장점 : https://fortegrp.com/the-importance-of-unit-testing/
Supplier : https://m.blog.naver.com/zzang9ha/222087025042
Executable : https://junit.org/junit5/docs/5.0.3/api/org/junit/jupiter/api/function/Executable.html
https://junit.org/junit5/docs/current/user-guide/#writing-tests-repeated-tests
JUnit 5 User Guide
Although the JUnit Jupiter programming model and extension model do not support JUnit 4 features such as Rules and Runners natively, it is not expected that source code maintainers will need to update all of their existing tests, test extensions, and custo
junit.org
더 자바, 애플리케이션을 테스트하는 다양한 방법 - 인프런 | 강의
자바 프로그래밍 언어를 사용하고 있거나 공부하고 있는 학생 또는 개발자라면 반드시 알아야 하는 애플리케이션을 테스트하는 다양한 방법을 학습합니다., - 강의 소개 | 인프런...
www.inflearn.com
Spring Boot Unit Testing with JUnit, Mockito and MockMvc
Spring Boot Unit Testing with JUnit, Mockito and MockMvc
Develop Real-Time Spring Boot Unit Tests: JUnit 5, Mockito, MockMvc, TDD, JsonPath, Hamcrest, H2 Embedded DB, MySQL
www.udemy.com
'Programming > Java' 카테고리의 다른 글
| @SafeVarargs Annotation (추가 학습 필요) (0) | 2022.12.19 |
|---|---|
| Trouble Shooting: java list ( Arrays.asList(), List.of() )사용시 UnsupportedOperationException 해결법 (0) | 2022.12.19 |
| Junit5에서 assertIterableEquals과 assertLinesMatch의 차이점 (0) | 2022.10.25 |
| 컬렉션 프레임워크 (Collections Framework) (0) | 2022.06.11 |
| Java Optional 클래스 (0) | 2022.01.11 |
- Total
- Today
- Yesterday